> ## Documentation Index
> Fetch the complete documentation index at: https://docs.braintrust.ti.trilogy.com/llms.txt
> Use this file to discover all available pages before exploring further.
# Triggers
> Automate your experts with Standard, Custom, and Calendar triggers — no manual prompts required.
Triggers let an expert run automatically — on a schedule, on a repeating basis, or in response to calendar events — without you sending a message each time.
## Finding the Triggers Panel
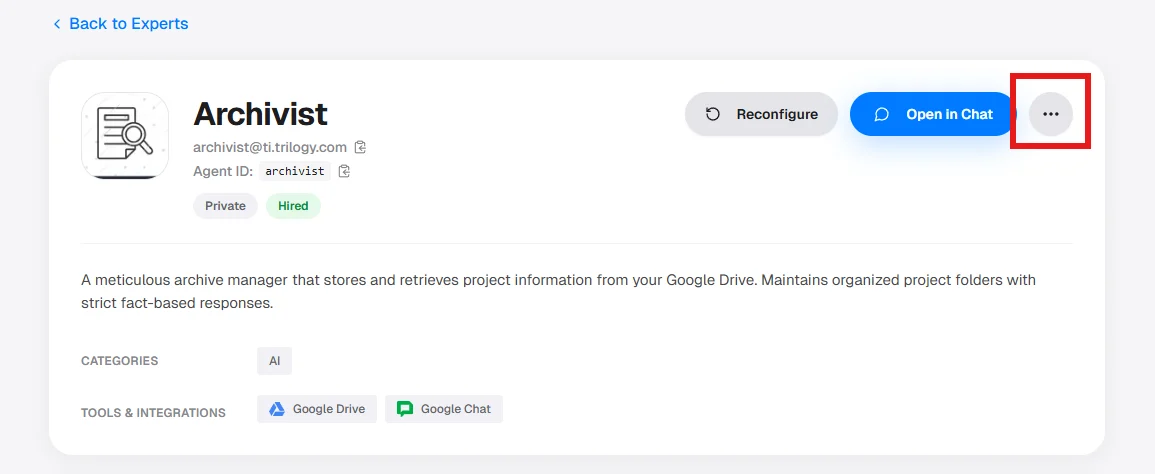
Triggers are accessed from the expert's detail page via the **More menu** (`...`).
On the expert's detail page, click the **`...`** button in the top-right corner of the expert card.
 In the dropdown that appears, click **Triggers**.
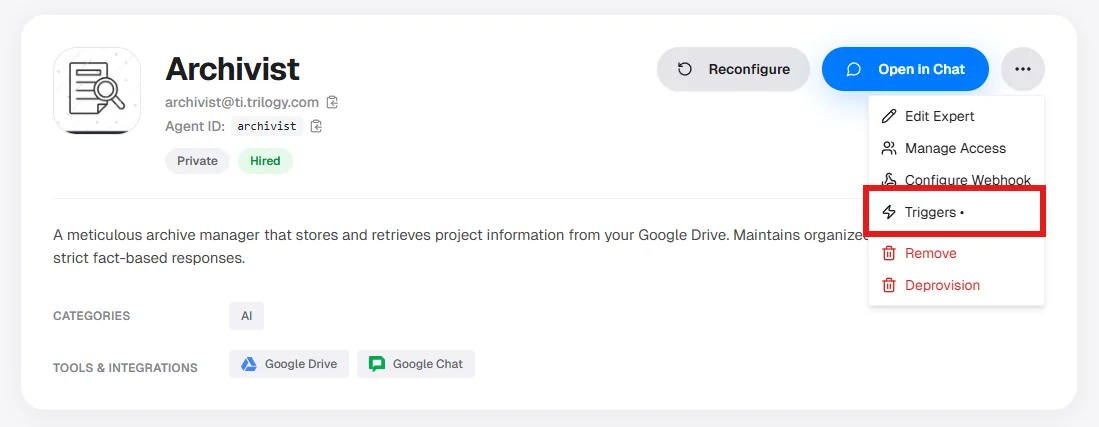 The **Expert Automations** modal opens. It has two tabs:
* **Standard Triggers** — pre-built templates from the expert's creator
* **Custom Triggers** — schedules you define yourself
***
## Standard Triggers vs Custom Triggers
| | Standard Triggers | Custom Triggers |
| -------------- | ----------------------------------------------------- | -------------------------------------- |
| **Defined by** | Expert owner/editor (built into the expert blueprint) | You |
| **Quantity** | One per template | Multiple per expert |
| **Types** | Cron (time-based) or Calendar (event-based) | Recurring (cron) or One-time |
| **Editing** | Updates overwrite the single template trigger | Each schedule is managed independently |
Use **Standard Triggers** when the expert already ships with the automation you need (a weekly report, a daily digest). Use **Custom Triggers** when you want to add your own schedule that wasn't pre-built into the expert.
***
Standard Triggers are pre-built automation templates defined by the expert's creator. Each expert ships with zero or more templates. Your job is to configure and enable them.
There are two types of Standard Triggers:
### Cron Triggers
A cron trigger fires on a repeating time-based schedule. Examples:
* Every weekday at 9 AM — summarize the email inbox
* Every Monday at 8 AM — generate a weekly status report
* Every hour — check for new support tickets
The **Expert Automations** modal opens. It has two tabs:
* **Standard Triggers** — pre-built templates from the expert's creator
* **Custom Triggers** — schedules you define yourself
***
## Standard Triggers vs Custom Triggers
| | Standard Triggers | Custom Triggers |
| -------------- | ----------------------------------------------------- | -------------------------------------- |
| **Defined by** | Expert owner/editor (built into the expert blueprint) | You |
| **Quantity** | One per template | Multiple per expert |
| **Types** | Cron (time-based) or Calendar (event-based) | Recurring (cron) or One-time |
| **Editing** | Updates overwrite the single template trigger | Each schedule is managed independently |
Use **Standard Triggers** when the expert already ships with the automation you need (a weekly report, a daily digest). Use **Custom Triggers** when you want to add your own schedule that wasn't pre-built into the expert.
***
Standard Triggers are pre-built automation templates defined by the expert's creator. Each expert ships with zero or more templates. Your job is to configure and enable them.
There are two types of Standard Triggers:
### Cron Triggers
A cron trigger fires on a repeating time-based schedule. Examples:
* Every weekday at 9 AM — summarize the email inbox
* Every Monday at 8 AM — generate a weekly status report
* Every hour — check for new support tickets
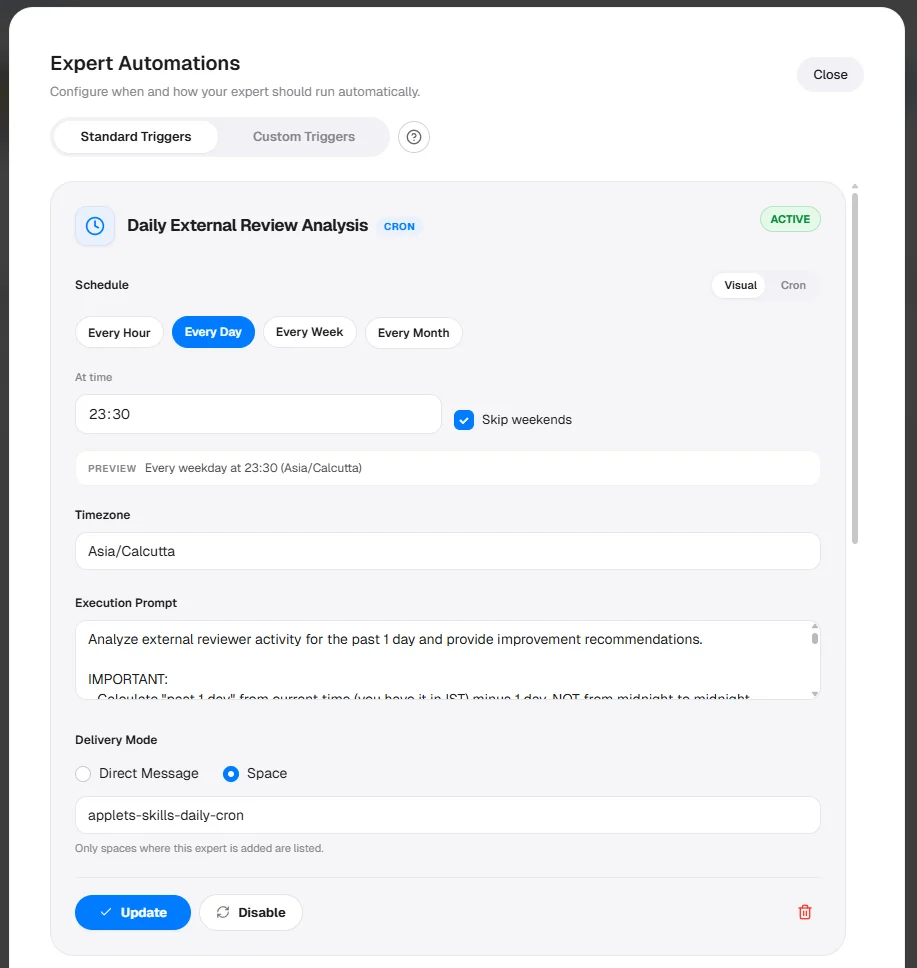 On the **Standard Triggers** tab, templates appear as cards. Each card shows the template name, type badge (**CRON**), and current status (**NOT CONFIGURED**, **ENABLED**, or **DISABLED**). Click the one you want to configure.
The schedule builder opens in **Visual** mode by default.
**Visual mode options:**
* Frequency: **Every Hour**, **Every Day**, **Every Week**, **Every Month**
* At time: time field in 24-hour format
* On days: day-of-week picker (for weekly schedules)
* **PREVIEW** row shows the human-readable result (e.g., `Every Mon at 09:00 (America/New_York)`)
To enter a raw cron expression, click the **Cron** toggle at the top of the schedule section to switch modes.
**Common cron expressions:**
| Expression | Meaning |
| ------------- | ----------------------------------- |
| `0 9 * * 1-5` | Every weekday at 9:00 AM |
| `0 8 * * 1` | Every Monday at 8:00 AM |
| `0 */2 * * *` | Every 2 hours |
| `30 17 * * *` | Every day at 5:30 PM |
| `0 9 1 * *` | First day of every month at 9:00 AM |
Select your timezone from the dropdown. The schedule fires at the specified time **in your selected timezone**.
If you do not set a timezone, the schedule defaults to UTC. A "9 AM" trigger in UTC may fire at 4 AM or 5 AM in US Eastern time.
Enter what the expert should do when the trigger fires.
Example:
> "Check my Gmail inbox for unread emails from the last 24 hours. Summarize the most important ones and list any action items."
The prompt must be at least **10 characters** long.
* **Direct Message (DM):** The expert sends output to your private DM.
* **Space:** The expert posts to a specific Google Chat Space. Select the Space from the dropdown.
Click **Save Automation**. The trigger is created in an enabled state and fires at the next scheduled time.
### Calendar Triggers
A calendar trigger watches your Google Calendar and activates the expert when events match your criteria — unlike cron triggers which run on a fixed clock, these are **event-driven**.
Examples:
* Before any meeting with more than 5 attendees — prepare a briefing document
* After any event tagged "Client Call" — draft follow-up notes
* When a new event is created — check for scheduling conflicts
On the **Standard Triggers** tab, select a template with the **CALENDAR** type badge.
If this is your first calendar trigger, you will need to authorize access:
1. Click **Connect** next to the Google Calendar status.
2. A Google OAuth window opens — sign in and grant access.
3. Once connected, the status changes to **Connected**.
The calendar connection must stay active for triggers to work. If you see a "Not connected" status, click Connect to re-authorize.
Choose which calendar to watch. The default is your **Primary Calendar**, but you can select any calendar you have access to.
Enter the instructions the expert should follow when an event triggers it.
Example:
> "For the upcoming meeting, research the attendees on LinkedIn and prepare a one-page briefing with their roles and recent activity."
Be specific about which events should trigger action and which should be ignored.
Select **Direct Message** or a specific **Space**.
Click **Save Automation**. The trigger starts watching your calendar immediately.
#### How Calendar Triggers Decide to Act
When a new or updated event appears on your calendar, the expert evaluates it and makes one of three decisions:
| Decision | What Happens |
| --------------- | ---------------------------------------------------------------------------------------- |
| **Ignore** | The event does not match the trigger criteria. No action taken. |
| **Schedule** | The event matches; the expert runs before the event starts (default: 10 minutes before). |
| **Execute Now** | The event matches; the expert acts immediately. |
#### Policy Prompt
The **Policy Prompt** is set by the expert creator (not the user who hires). It is the system prompt for a lightweight LLM evaluation step that runs *before* the expert acts.
**What actually happens:** When a new or updated calendar event arrives, the app passes the event details to an LLM using your Policy Prompt as the system prompt. The LLM returns a JSON decision. The app parses that JSON — not the expert, not a tool call — to decide whether and when to fire the expert.
**This is not an execution prompt.** At this step, no tools are available and the expert is not running yet. The only output is a JSON object.
**Required JSON output structure**
Your Policy Prompt must instruct the LLM to return valid JSON in this structure. If the LLM returns non-JSON text, parsing fails and that event defaults to `ignore` (logged server-side).
```json theme={null}
{
"action": "schedule",
"reason": "external customer meeting",
"leadTimeMinutes": 15,
"executeAtIso": "2026-04-20T14:45:00Z"
}
```
| Field | Required | Values / Notes |
| ----------------- | -------- | --------------------------------------------------------------------------------------------------------------------- |
| `action` | Yes | `"ignore"` — skip the event. `"schedule"` — run the expert before the event. `"execute_now"` — run immediately. |
| `reason` | No | Brief explanation, logged for debugging. |
| `leadTimeMinutes` | No | Minutes before event start to run the expert. Only applies when `action` is `"schedule"`. Default: **10**. |
| `executeAtIso` | No | ISO 8601 timestamp for an explicit run time. Only applies when `action` is `"schedule"`. Overrides `leadTimeMinutes`. |
The event details passed to the LLM include: event title, start time, description, attendees, organizer, location, and meeting link.
**If no Policy Prompt is set**, a built-in default prompt is used. It decides based on the agent's name and description and is conservative — it will ignore events when uncertain.
**Writing a Policy Prompt**
Your prompt replaces the entire default system prompt. You must include the JSON output requirement yourself, otherwise the LLM may return prose and that event will default to `ignore`.
```
You are evaluating calendar events for a meeting prep expert.
Act on events that are:
- External client calls
- Meetings with more than 2 attendees
Ignore: internal standups, 1-on-1s, lunch blocks, all-day events.
For matching events use "schedule" with 15 minutes lead time.
Return ONLY valid JSON — no markdown, no explanation outside the JSON:
{
"action": "ignore" | "schedule" | "execute_now",
"reason": "brief explanation",
"leadTimeMinutes": 15
}
```
If your Policy Prompt does not instruct the LLM to return JSON, the response cannot be parsed and the event defaults to `ignore` — no user-facing error is shown.
#### Calendar Subscription Renewal
Google Calendar subscriptions expire after **7 days**. Braintrust automatically renews them before expiry via a daily background job.
If automatic renewal fails, go to the Triggers panel, click **Connect** to re-authorize, then save the trigger again.
Use the **Cleanup Calendar** button if you have stale subscriptions — this removes all existing Google Calendar subscriptions so you can start fresh.
### Managing Standard Triggers
**Enable / Disable** — Use the toggle next to the trigger.
**Edit** — Click the trigger to update its schedule, prompt, timezone, or delivery mode. Click **Update** to save.
**Delete** — Click the **Delete** button on the trigger card to remove it permanently.
Deleting a standard trigger is permanent. Use the enable/disable toggle if you only want to pause it.
Custom Triggers are schedules you create yourself for any hired expert. You name them, choose the timing, write the prompt, and manage them independently.
On the **Standard Triggers** tab, templates appear as cards. Each card shows the template name, type badge (**CRON**), and current status (**NOT CONFIGURED**, **ENABLED**, or **DISABLED**). Click the one you want to configure.
The schedule builder opens in **Visual** mode by default.
**Visual mode options:**
* Frequency: **Every Hour**, **Every Day**, **Every Week**, **Every Month**
* At time: time field in 24-hour format
* On days: day-of-week picker (for weekly schedules)
* **PREVIEW** row shows the human-readable result (e.g., `Every Mon at 09:00 (America/New_York)`)
To enter a raw cron expression, click the **Cron** toggle at the top of the schedule section to switch modes.
**Common cron expressions:**
| Expression | Meaning |
| ------------- | ----------------------------------- |
| `0 9 * * 1-5` | Every weekday at 9:00 AM |
| `0 8 * * 1` | Every Monday at 8:00 AM |
| `0 */2 * * *` | Every 2 hours |
| `30 17 * * *` | Every day at 5:30 PM |
| `0 9 1 * *` | First day of every month at 9:00 AM |
Select your timezone from the dropdown. The schedule fires at the specified time **in your selected timezone**.
If you do not set a timezone, the schedule defaults to UTC. A "9 AM" trigger in UTC may fire at 4 AM or 5 AM in US Eastern time.
Enter what the expert should do when the trigger fires.
Example:
> "Check my Gmail inbox for unread emails from the last 24 hours. Summarize the most important ones and list any action items."
The prompt must be at least **10 characters** long.
* **Direct Message (DM):** The expert sends output to your private DM.
* **Space:** The expert posts to a specific Google Chat Space. Select the Space from the dropdown.
Click **Save Automation**. The trigger is created in an enabled state and fires at the next scheduled time.
### Calendar Triggers
A calendar trigger watches your Google Calendar and activates the expert when events match your criteria — unlike cron triggers which run on a fixed clock, these are **event-driven**.
Examples:
* Before any meeting with more than 5 attendees — prepare a briefing document
* After any event tagged "Client Call" — draft follow-up notes
* When a new event is created — check for scheduling conflicts
On the **Standard Triggers** tab, select a template with the **CALENDAR** type badge.
If this is your first calendar trigger, you will need to authorize access:
1. Click **Connect** next to the Google Calendar status.
2. A Google OAuth window opens — sign in and grant access.
3. Once connected, the status changes to **Connected**.
The calendar connection must stay active for triggers to work. If you see a "Not connected" status, click Connect to re-authorize.
Choose which calendar to watch. The default is your **Primary Calendar**, but you can select any calendar you have access to.
Enter the instructions the expert should follow when an event triggers it.
Example:
> "For the upcoming meeting, research the attendees on LinkedIn and prepare a one-page briefing with their roles and recent activity."
Be specific about which events should trigger action and which should be ignored.
Select **Direct Message** or a specific **Space**.
Click **Save Automation**. The trigger starts watching your calendar immediately.
#### How Calendar Triggers Decide to Act
When a new or updated event appears on your calendar, the expert evaluates it and makes one of three decisions:
| Decision | What Happens |
| --------------- | ---------------------------------------------------------------------------------------- |
| **Ignore** | The event does not match the trigger criteria. No action taken. |
| **Schedule** | The event matches; the expert runs before the event starts (default: 10 minutes before). |
| **Execute Now** | The event matches; the expert acts immediately. |
#### Policy Prompt
The **Policy Prompt** is set by the expert creator (not the user who hires). It is the system prompt for a lightweight LLM evaluation step that runs *before* the expert acts.
**What actually happens:** When a new or updated calendar event arrives, the app passes the event details to an LLM using your Policy Prompt as the system prompt. The LLM returns a JSON decision. The app parses that JSON — not the expert, not a tool call — to decide whether and when to fire the expert.
**This is not an execution prompt.** At this step, no tools are available and the expert is not running yet. The only output is a JSON object.
**Required JSON output structure**
Your Policy Prompt must instruct the LLM to return valid JSON in this structure. If the LLM returns non-JSON text, parsing fails and that event defaults to `ignore` (logged server-side).
```json theme={null}
{
"action": "schedule",
"reason": "external customer meeting",
"leadTimeMinutes": 15,
"executeAtIso": "2026-04-20T14:45:00Z"
}
```
| Field | Required | Values / Notes |
| ----------------- | -------- | --------------------------------------------------------------------------------------------------------------------- |
| `action` | Yes | `"ignore"` — skip the event. `"schedule"` — run the expert before the event. `"execute_now"` — run immediately. |
| `reason` | No | Brief explanation, logged for debugging. |
| `leadTimeMinutes` | No | Minutes before event start to run the expert. Only applies when `action` is `"schedule"`. Default: **10**. |
| `executeAtIso` | No | ISO 8601 timestamp for an explicit run time. Only applies when `action` is `"schedule"`. Overrides `leadTimeMinutes`. |
The event details passed to the LLM include: event title, start time, description, attendees, organizer, location, and meeting link.
**If no Policy Prompt is set**, a built-in default prompt is used. It decides based on the agent's name and description and is conservative — it will ignore events when uncertain.
**Writing a Policy Prompt**
Your prompt replaces the entire default system prompt. You must include the JSON output requirement yourself, otherwise the LLM may return prose and that event will default to `ignore`.
```
You are evaluating calendar events for a meeting prep expert.
Act on events that are:
- External client calls
- Meetings with more than 2 attendees
Ignore: internal standups, 1-on-1s, lunch blocks, all-day events.
For matching events use "schedule" with 15 minutes lead time.
Return ONLY valid JSON — no markdown, no explanation outside the JSON:
{
"action": "ignore" | "schedule" | "execute_now",
"reason": "brief explanation",
"leadTimeMinutes": 15
}
```
If your Policy Prompt does not instruct the LLM to return JSON, the response cannot be parsed and the event defaults to `ignore` — no user-facing error is shown.
#### Calendar Subscription Renewal
Google Calendar subscriptions expire after **7 days**. Braintrust automatically renews them before expiry via a daily background job.
If automatic renewal fails, go to the Triggers panel, click **Connect** to re-authorize, then save the trigger again.
Use the **Cleanup Calendar** button if you have stale subscriptions — this removes all existing Google Calendar subscriptions so you can start fresh.
### Managing Standard Triggers
**Enable / Disable** — Use the toggle next to the trigger.
**Edit** — Click the trigger to update its schedule, prompt, timezone, or delivery mode. Click **Update** to save.
**Delete** — Click the **Delete** button on the trigger card to remove it permanently.
Deleting a standard trigger is permanent. Use the enable/disable toggle if you only want to pause it.
Custom Triggers are schedules you create yourself for any hired expert. You name them, choose the timing, write the prompt, and manage them independently.
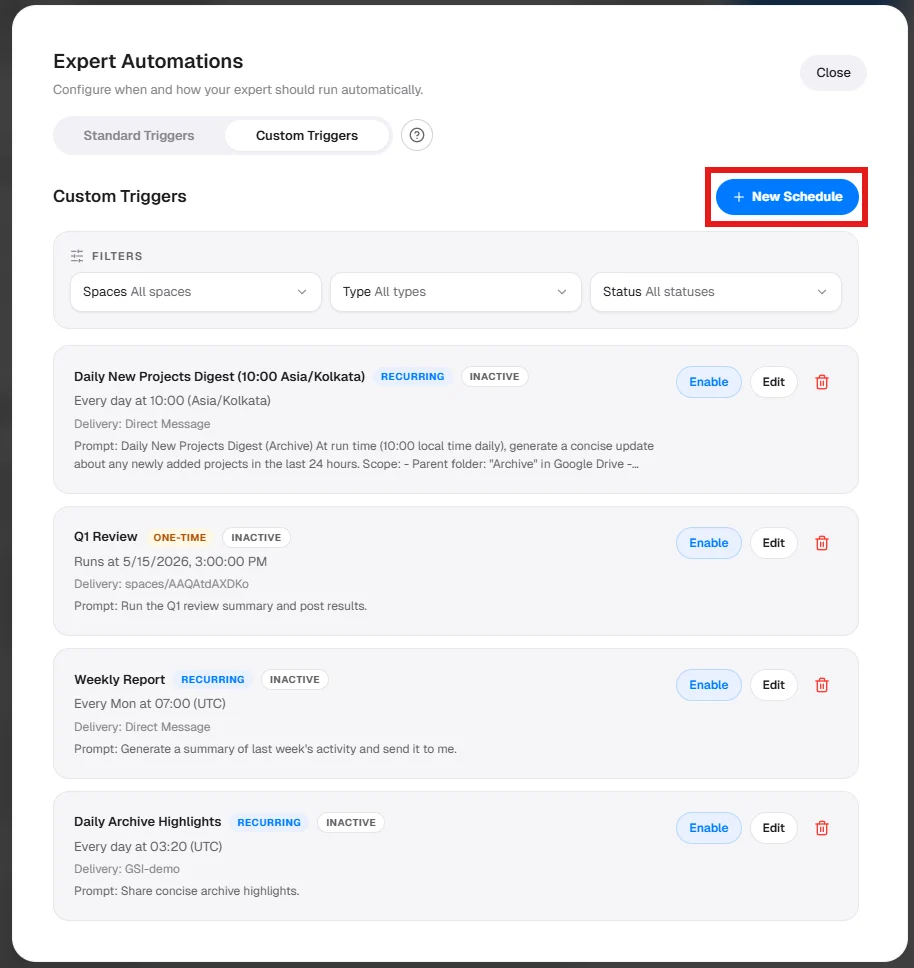
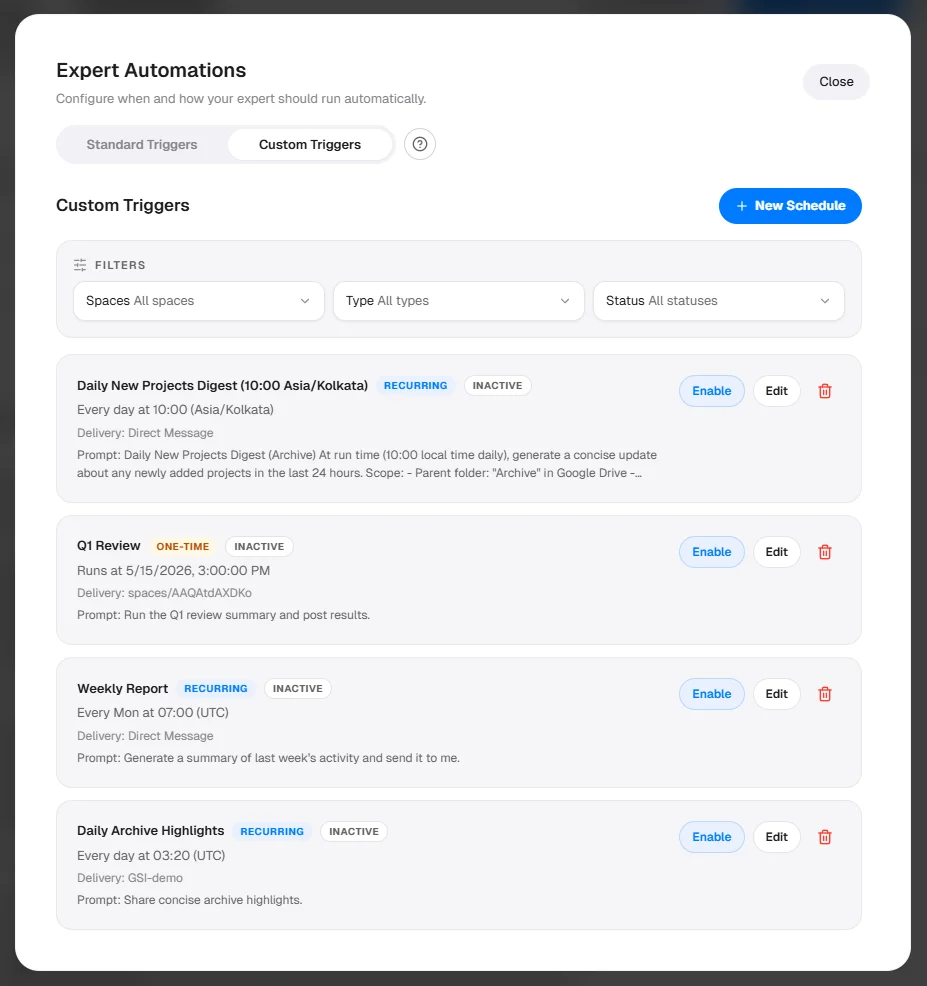 Each schedule card shows: name, type badge (**RECURRING** or **ONE-TIME**), status (**ACTIVE** or **INACTIVE**), human-readable schedule, delivery destination, and prompt preview.
## Creating a Custom Trigger
There are two ways — via chat (fastest) or via the UI form (most control). Both methods produce the same result, and **triggers created via chat appear in the Custom Triggers tab immediately**.
### Via Chat
Ask the expert directly in your DM or Space:
> "Remind me every Monday at 9 AM to summarize last week's activity."
> "Remind me next Friday at 3 PM to pull the weekly sales report."
The expert confirms the details and creates the schedule. You can also manage existing triggers via chat:
> "Disable the Monday standup schedule."
> "Update my weekly report schedule to run at 10 AM instead."
> "Delete the Friday sales report schedule."
All chat changes are reflected in the Custom Triggers tab in real time.
### Via the UI — Recurring Schedule
A recurring schedule runs on a repeating cron-based pattern.
Each schedule card shows: name, type badge (**RECURRING** or **ONE-TIME**), status (**ACTIVE** or **INACTIVE**), human-readable schedule, delivery destination, and prompt preview.
## Creating a Custom Trigger
There are two ways — via chat (fastest) or via the UI form (most control). Both methods produce the same result, and **triggers created via chat appear in the Custom Triggers tab immediately**.
### Via Chat
Ask the expert directly in your DM or Space:
> "Remind me every Monday at 9 AM to summarize last week's activity."
> "Remind me next Friday at 3 PM to pull the weekly sales report."
The expert confirms the details and creates the schedule. You can also manage existing triggers via chat:
> "Disable the Monday standup schedule."
> "Update my weekly report schedule to run at 10 AM instead."
> "Delete the Friday sales report schedule."
All chat changes are reflected in the Custom Triggers tab in real time.
### Via the UI — Recurring Schedule
A recurring schedule runs on a repeating cron-based pattern.
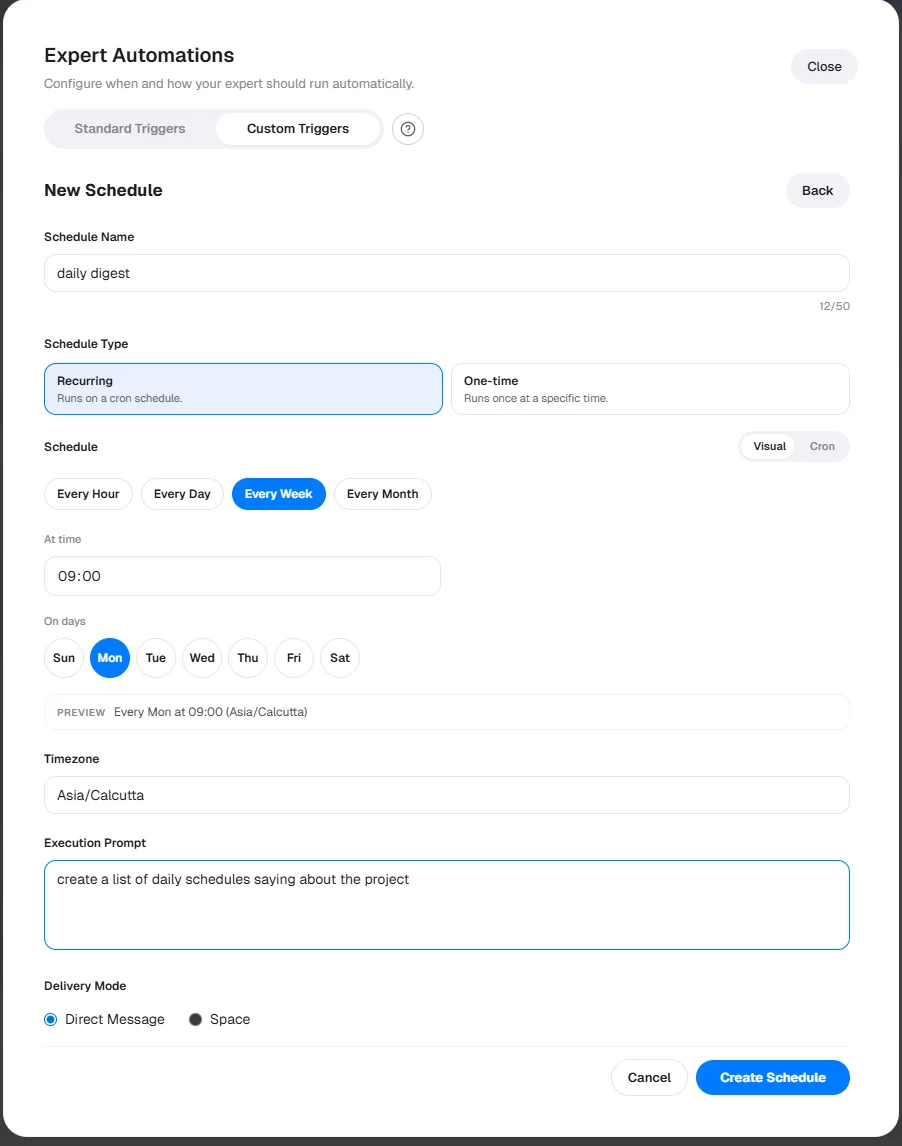 Type a name between **5 and 50 characters** (e.g., `Daily Standup Summary`, `Weekly Report`).
Click **Recurring** under Schedule Type. Subtitle: "Runs on a cron schedule."
The schedule builder opens in **Visual** mode. To enter a raw cron expression, click the **Cron** toggle.
**Visual mode options:**
* Frequency: **Every Hour**, **Every Day**, **Every Week**, **Every Month**
* At time: 24-hour time field
* On days: day-of-week picker (weekly schedules)
* **PREVIEW** row shows the human-readable result
**Common cron expressions:**
| Expression | Meaning |
| ------------- | ----------------------------------- |
| `0 9 * * 1-5` | Every weekday at 9:00 AM |
| `0 8 * * 1` | Every Monday at 8:00 AM |
| `0 */2 * * *` | Every 2 hours |
| `30 17 * * *` | Every day at 5:30 PM |
| `0 9 1 * *` | First day of every month at 9:00 AM |
Enter an IANA timezone string (e.g., `America/New_York`, `Europe/London`, `Asia/Calcutta`).
Enter the instructions the expert should follow each time it fires. Minimum **10 characters**.
Example:
> "Summarize new activity from the past 24 hours and post the highlights."
* **Direct Message** — output sent to your private DM
* **Space** — output posted to a Google Chat Space (select from dropdown)
Click **Create Schedule**. The schedule becomes active immediately.
### Via the UI — One-Time Schedule
A one-time schedule runs once at a specific date and time, then stops.
Type a name between **5 and 50 characters** (e.g., `Daily Standup Summary`, `Weekly Report`).
Click **Recurring** under Schedule Type. Subtitle: "Runs on a cron schedule."
The schedule builder opens in **Visual** mode. To enter a raw cron expression, click the **Cron** toggle.
**Visual mode options:**
* Frequency: **Every Hour**, **Every Day**, **Every Week**, **Every Month**
* At time: 24-hour time field
* On days: day-of-week picker (weekly schedules)
* **PREVIEW** row shows the human-readable result
**Common cron expressions:**
| Expression | Meaning |
| ------------- | ----------------------------------- |
| `0 9 * * 1-5` | Every weekday at 9:00 AM |
| `0 8 * * 1` | Every Monday at 8:00 AM |
| `0 */2 * * *` | Every 2 hours |
| `30 17 * * *` | Every day at 5:30 PM |
| `0 9 1 * *` | First day of every month at 9:00 AM |
Enter an IANA timezone string (e.g., `America/New_York`, `Europe/London`, `Asia/Calcutta`).
Enter the instructions the expert should follow each time it fires. Minimum **10 characters**.
Example:
> "Summarize new activity from the past 24 hours and post the highlights."
* **Direct Message** — output sent to your private DM
* **Space** — output posted to a Google Chat Space (select from dropdown)
Click **Create Schedule**. The schedule becomes active immediately.
### Via the UI — One-Time Schedule
A one-time schedule runs once at a specific date and time, then stops.
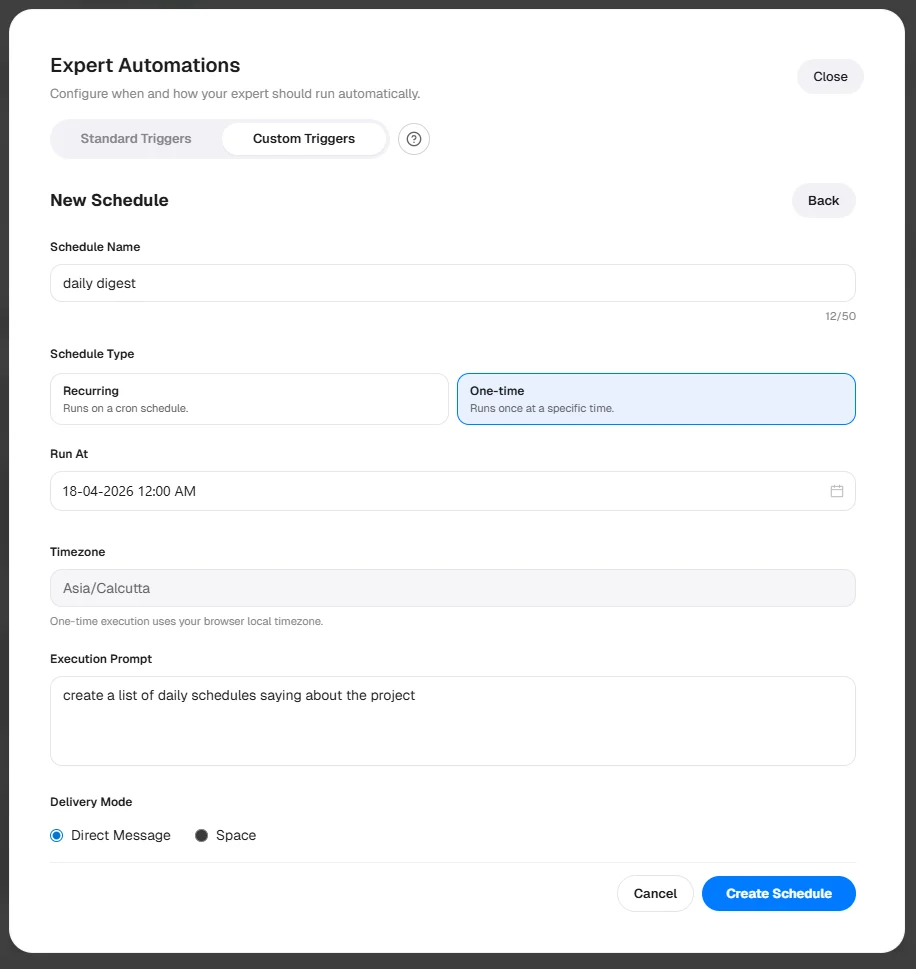 Type a name between 5 and 50 characters.
Click **One-time**. Subtitle: "Runs once at a specific time."
Use the date/time picker to select when the expert should run. Must be at least **5 minutes in the future**.
One-time schedules use your **browser's local timezone** automatically. The timezone field is read-only and pre-filled.
Enter instructions for this single run. Minimum 10 characters.
Choose Direct Message or Space.
Click **Create Schedule**. The schedule is queued and fires once at the selected time.
## Managing Custom Triggers
### Enable / Disable
Use the **Enable** or **Disable** button on any schedule card — or ask via chat.
Type a name between 5 and 50 characters.
Click **One-time**. Subtitle: "Runs once at a specific time."
Use the date/time picker to select when the expert should run. Must be at least **5 minutes in the future**.
One-time schedules use your **browser's local timezone** automatically. The timezone field is read-only and pre-filled.
Enter instructions for this single run. Minimum 10 characters.
Choose Direct Message or Space.
Click **Create Schedule**. The schedule is queued and fires once at the selected time.
## Managing Custom Triggers
### Enable / Disable
Use the **Enable** or **Disable** button on any schedule card — or ask via chat.
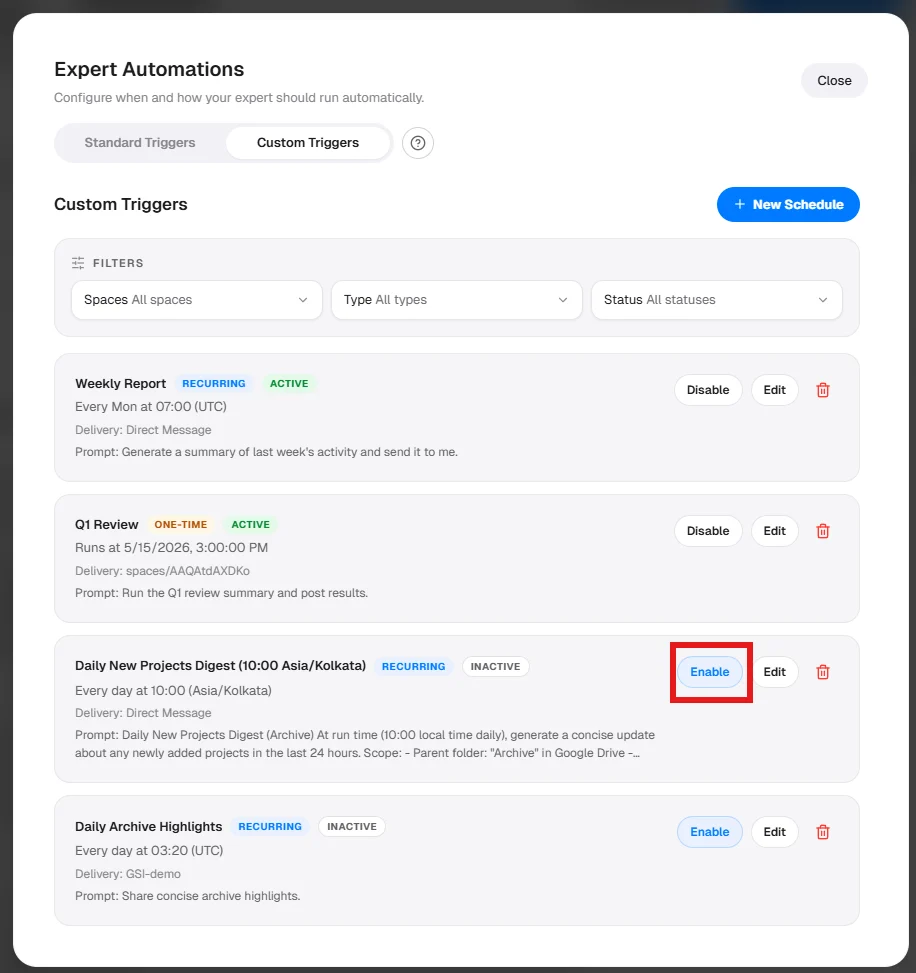 An **INACTIVE** schedule never fires until re-enabled. Useful for pausing seasonal automations without losing the configuration.
### Edit
Click **Edit** on a schedule card — or ask the expert via chat — to update any field. Click **Update Schedule** to save.
### Delete
Click the **trash icon** to permanently delete a schedule (confirm required) — or ask the expert via chat. This cannot be undone.
Use **Disable** instead of Delete if you only want to pause a schedule temporarily.
### Filter the List
| Filter | Options |
| ---------- | ----------------------------------------------------- |
| **Spaces** | Filter by delivery destination (DM or specific space) |
| **Type** | Recurring, One-time, or both |
| **Status** | Active, Inactive, or both |
## Limits
| Limit | Value |
| ------------------------------------------------------ | --------------------------- |
| Max active schedules per scope (DM or Space) | **5** |
| Min interval between recurring schedules in same scope | **15 minutes** |
| One-time schedule must be at least | **5 minutes** in the future |
| Schedule name length | **5–50 characters** |
| Execution prompt minimum length | **10 characters** |
If you exceed 5 active schedules for a given delivery destination, the form will block saving until you disable or delete an existing schedule for that scope.
***
## Troubleshooting
| Problem | Solution |
| ---------------------------------------- | ---------------------------------------------------------------------------------------------- |
| Trigger is not firing | Check that the trigger is **Enabled**. Verify the schedule and timezone. |
| Trigger fires at the wrong time | Double-check the timezone setting. Cron expressions use 24-hour time. |
| Expert output is empty or unhelpful | Make the execution prompt more specific — include what data to check and how to format output. |
| Calendar trigger does not fire | Check that Google Calendar is connected (green status). Try disconnecting and reconnecting. |
| Expert acts on the wrong calendar events | Add explicit criteria to your prompt (e.g., "only for meetings with external attendees"). |
| "Not connected" calendar status | The OAuth token expired. Click Connect to re-authorize. |
***
Tips for writing effective prompts for both triggers and live conversations.
Customize the expert's behavior, tools, and configuration.
An **INACTIVE** schedule never fires until re-enabled. Useful for pausing seasonal automations without losing the configuration.
### Edit
Click **Edit** on a schedule card — or ask the expert via chat — to update any field. Click **Update Schedule** to save.
### Delete
Click the **trash icon** to permanently delete a schedule (confirm required) — or ask the expert via chat. This cannot be undone.
Use **Disable** instead of Delete if you only want to pause a schedule temporarily.
### Filter the List
| Filter | Options |
| ---------- | ----------------------------------------------------- |
| **Spaces** | Filter by delivery destination (DM or specific space) |
| **Type** | Recurring, One-time, or both |
| **Status** | Active, Inactive, or both |
## Limits
| Limit | Value |
| ------------------------------------------------------ | --------------------------- |
| Max active schedules per scope (DM or Space) | **5** |
| Min interval between recurring schedules in same scope | **15 minutes** |
| One-time schedule must be at least | **5 minutes** in the future |
| Schedule name length | **5–50 characters** |
| Execution prompt minimum length | **10 characters** |
If you exceed 5 active schedules for a given delivery destination, the form will block saving until you disable or delete an existing schedule for that scope.
***
## Troubleshooting
| Problem | Solution |
| ---------------------------------------- | ---------------------------------------------------------------------------------------------- |
| Trigger is not firing | Check that the trigger is **Enabled**. Verify the schedule and timezone. |
| Trigger fires at the wrong time | Double-check the timezone setting. Cron expressions use 24-hour time. |
| Expert output is empty or unhelpful | Make the execution prompt more specific — include what data to check and how to format output. |
| Calendar trigger does not fire | Check that Google Calendar is connected (green status). Try disconnecting and reconnecting. |
| Expert acts on the wrong calendar events | Add explicit criteria to your prompt (e.g., "only for meetings with external attendees"). |
| "Not connected" calendar status | The OAuth token expired. Click Connect to re-authorize. |
***
Tips for writing effective prompts for both triggers and live conversations.
Customize the expert's behavior, tools, and configuration.