> ## Documentation Index
> Fetch the complete documentation index at: https://docs.braintrust.ti.trilogy.com/llms.txt
> Use this file to discover all available pages before exploring further.
# Creating an Expert
> Create, configure, and publish a custom expert your team can hire.
Creating an expert is the fastest way to package your team's workflow into something reusable in Google Chat.
This guide focuses on the flow. For field-by-field definitions, use [Expert Fields Reference](/experts/expert-fields-reference).
## Before You Start
* Decide the expert's job in one sentence.
* Pick the minimum tools it needs.
* Prepare one realistic test prompt you will run after creation.
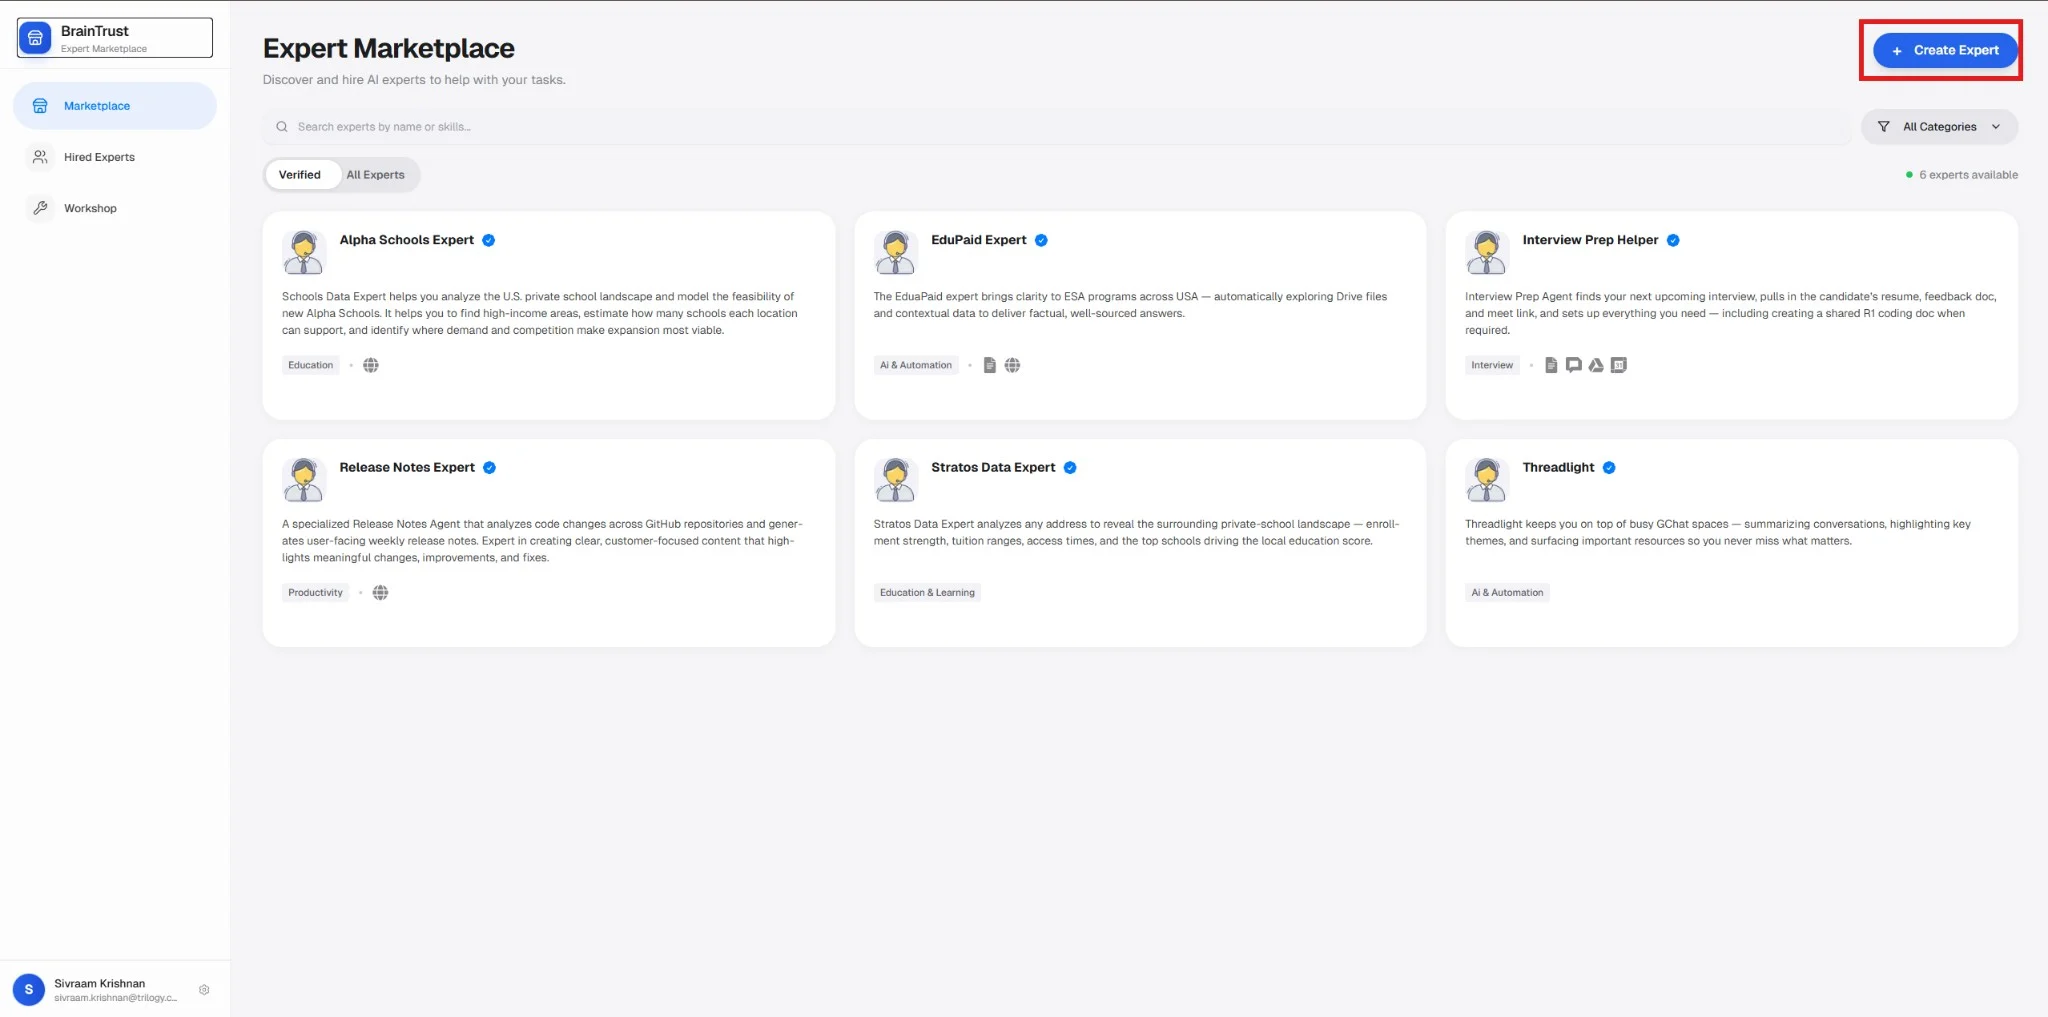
## Step 1: Open Create Expert
From the marketplace, click **Create Expert**.
 ## Step 2: Fill Basics
In the **Basics** step, set the expert's identity:
| Field | Required | Purpose |
| --------------- | -------- | ----------------------------------------------------------------------------------------------------------------------- |
| **Name** | Yes | Display name shown in the marketplace and chat headers. Use a clear role-based name (e.g. `Quarterly Planning Expert`). |
| **Description** | Yes | One-line summary shown in marketplace listings. Focus on outcomes, not features. |
| **Logo URL** | No | Avatar image displayed in the UI. Must be a public HTTPS URL. |
| **About** | No | Long-form markdown content shown on the expert's detail page — use for scope, example prompts, limitations. |
## Step 3: Set Behavior
Define how the expert thinks and responds:
| Field | Required | Purpose |
| ------------------------- | -------- | -------------------------------------------------------------------------------------------------------------------------------------------------------------------------------------------- |
| **System Prompt** | Yes | The expert's operating instructions — role, what it does and doesn't do, which tools to use and when, and expected output format. This is the single biggest factor in quality. |
| **Custom Hiring Message** | No | The first message the expert sends after someone hires it. Use this to suggest a first question or set expectations (e.g. "Hi! Ask me to summarize your inbox or pull last week's report."). |
| **Skills** | No | Reusable packaged behaviors or reference files that extend the expert's capabilities. Add only for structured, repeatable workflows. |
| **Categories** | No | Marketplace tags used for discoverability. Add 2–5 specific categories. |
Write the System Prompt as operating instructions, not a product description. Structure it as: **role → what it does NOT do → tool usage rules → output format → how to handle uncertainty**.
### Intelligence — Model Selection
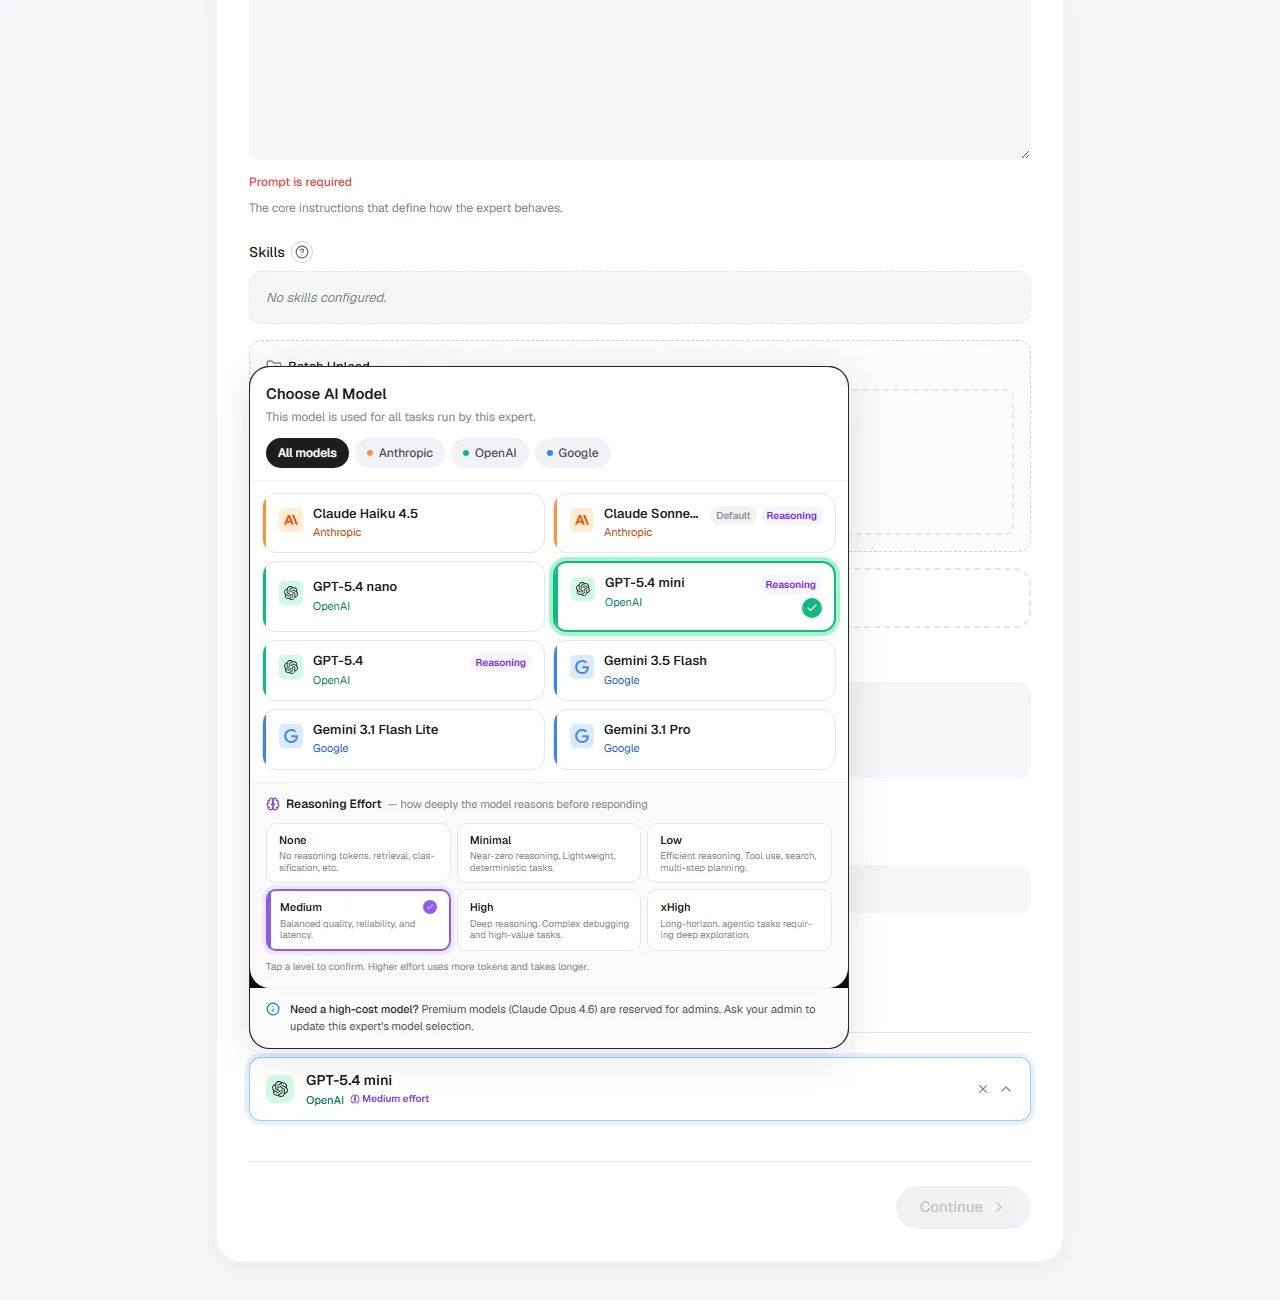
In the **Intelligence** section of the Basics step, you can choose the AI model that powers this expert. If you leave it unset, the expert uses the platform default (**Claude Sonnet 4.6**). Reasoning-capable models also expose a **Reasoning effort** control — see [Reasoning effort](#reasoning-effort) below.
Available models are grouped by provider. You can filter by **Anthropic**, **OpenAI**, or **Google**:
| Model | Provider | Best for |
| ------------------------------------- | --------- | ------------------------------------------------------------------------------------ |
| **Claude Haiku 4.5** | Anthropic | High-volume, cost-sensitive tasks. Fast with 200k context. |
| **Claude Sonnet 4.6** *(default)* | Anthropic | Complex agent workflows. Best speed/intelligence balance. 1M context. |
| **Claude Opus 4.8** *(admin only)* | Anthropic | Most capable for complex reasoning and agentic coding. 1M context, 128k max output. |
| **Claude Opus 4.7** *(admin only)* | Anthropic | Most demanding agentic tasks. 1M context, 128k max output. |
| **Claude Opus 4.6** *(admin only)* | Anthropic | High reasoning quality for agents and coding. 1M context, 128k max output. |
| **Claude Fable 5** *(admin only)* | Anthropic | Long-horizon agentic work. Always-on adaptive thinking. 1M context, 128k max output. |
| **GPT-5.4 nano** | OpenAI | Simple, high-throughput tasks. 400k context. |
| **GPT-5.4 mini** | OpenAI | Coding, computer use, subagents. 400k context. |
| **GPT-5.4** | OpenAI | Flagship OpenAI model for agentic workflows. 1M context. |
| **GPT-5.5** *(admin only)* | OpenAI | OpenAI's most capable reasoning model. Configurable reasoning effort. |
| **Gemini 3.5 Flash** | Google | Sustained frontier performance on agentic and coding tasks. 1M context. |
| **Gemini 3.1 Flash Lite** *(Preview)* | Google | Fastest, most cost-efficient Gemini 3.1 model. High-volume, low-latency tasks. |
| **Gemini 3.1 Pro** *(Preview)* | Google | Google's state-of-the-art model. Complex agentic workflows. 1M context. |
**Premium models** (Claude Opus 4.8, Claude Opus 4.7, Claude Opus 4.6, Claude Fable 5, and GPT-5.5) are only visible and selectable by admins. Standard editors and owners see standard-tier models only.
### Reasoning effort
For reasoning-capable models — currently Claude Sonnet 4.6, the Claude Opus family (4.8 / 4.7 / 4.6), Claude Fable 5, and the OpenAI GPT-5.4 and GPT-5.5 models — the create-expert form exposes a **Reasoning effort** dropdown adjacent to the model picker. This dropdown controls how many tokens the model may spend on internal chain-of-thought before producing a response. Each model exposes only the effort levels it supports, so the available options vary by model. The dropdown is hidden for models that do not support reasoning effort (Claude Haiku 4.5 and the Gemini models).
## Step 2: Fill Basics
In the **Basics** step, set the expert's identity:
| Field | Required | Purpose |
| --------------- | -------- | ----------------------------------------------------------------------------------------------------------------------- |
| **Name** | Yes | Display name shown in the marketplace and chat headers. Use a clear role-based name (e.g. `Quarterly Planning Expert`). |
| **Description** | Yes | One-line summary shown in marketplace listings. Focus on outcomes, not features. |
| **Logo URL** | No | Avatar image displayed in the UI. Must be a public HTTPS URL. |
| **About** | No | Long-form markdown content shown on the expert's detail page — use for scope, example prompts, limitations. |
## Step 3: Set Behavior
Define how the expert thinks and responds:
| Field | Required | Purpose |
| ------------------------- | -------- | -------------------------------------------------------------------------------------------------------------------------------------------------------------------------------------------- |
| **System Prompt** | Yes | The expert's operating instructions — role, what it does and doesn't do, which tools to use and when, and expected output format. This is the single biggest factor in quality. |
| **Custom Hiring Message** | No | The first message the expert sends after someone hires it. Use this to suggest a first question or set expectations (e.g. "Hi! Ask me to summarize your inbox or pull last week's report."). |
| **Skills** | No | Reusable packaged behaviors or reference files that extend the expert's capabilities. Add only for structured, repeatable workflows. |
| **Categories** | No | Marketplace tags used for discoverability. Add 2–5 specific categories. |
Write the System Prompt as operating instructions, not a product description. Structure it as: **role → what it does NOT do → tool usage rules → output format → how to handle uncertainty**.
### Intelligence — Model Selection
In the **Intelligence** section of the Basics step, you can choose the AI model that powers this expert. If you leave it unset, the expert uses the platform default (**Claude Sonnet 4.6**). Reasoning-capable models also expose a **Reasoning effort** control — see [Reasoning effort](#reasoning-effort) below.
Available models are grouped by provider. You can filter by **Anthropic**, **OpenAI**, or **Google**:
| Model | Provider | Best for |
| ------------------------------------- | --------- | ------------------------------------------------------------------------------------ |
| **Claude Haiku 4.5** | Anthropic | High-volume, cost-sensitive tasks. Fast with 200k context. |
| **Claude Sonnet 4.6** *(default)* | Anthropic | Complex agent workflows. Best speed/intelligence balance. 1M context. |
| **Claude Opus 4.8** *(admin only)* | Anthropic | Most capable for complex reasoning and agentic coding. 1M context, 128k max output. |
| **Claude Opus 4.7** *(admin only)* | Anthropic | Most demanding agentic tasks. 1M context, 128k max output. |
| **Claude Opus 4.6** *(admin only)* | Anthropic | High reasoning quality for agents and coding. 1M context, 128k max output. |
| **Claude Fable 5** *(admin only)* | Anthropic | Long-horizon agentic work. Always-on adaptive thinking. 1M context, 128k max output. |
| **GPT-5.4 nano** | OpenAI | Simple, high-throughput tasks. 400k context. |
| **GPT-5.4 mini** | OpenAI | Coding, computer use, subagents. 400k context. |
| **GPT-5.4** | OpenAI | Flagship OpenAI model for agentic workflows. 1M context. |
| **GPT-5.5** *(admin only)* | OpenAI | OpenAI's most capable reasoning model. Configurable reasoning effort. |
| **Gemini 3.5 Flash** | Google | Sustained frontier performance on agentic and coding tasks. 1M context. |
| **Gemini 3.1 Flash Lite** *(Preview)* | Google | Fastest, most cost-efficient Gemini 3.1 model. High-volume, low-latency tasks. |
| **Gemini 3.1 Pro** *(Preview)* | Google | Google's state-of-the-art model. Complex agentic workflows. 1M context. |
**Premium models** (Claude Opus 4.8, Claude Opus 4.7, Claude Opus 4.6, Claude Fable 5, and GPT-5.5) are only visible and selectable by admins. Standard editors and owners see standard-tier models only.
### Reasoning effort
For reasoning-capable models — currently Claude Sonnet 4.6, the Claude Opus family (4.8 / 4.7 / 4.6), Claude Fable 5, and the OpenAI GPT-5.4 and GPT-5.5 models — the create-expert form exposes a **Reasoning effort** dropdown adjacent to the model picker. This dropdown controls how many tokens the model may spend on internal chain-of-thought before producing a response. Each model exposes only the effort levels it supports, so the available options vary by model. The dropdown is hidden for models that do not support reasoning effort (Claude Haiku 4.5 and the Gemini models).
 | Value | Meaning |
| --------- | --------------------------------------------------------------------------------------------------------------------------------------------- |
| `none` | Disables chain-of-thought reasoning entirely. Fastest and cheapest; use for simple, well-defined tasks. |
| `minimal` | Minimal reasoning budget. Marginally slower than `none`; suitable for straightforward tasks that benefit from a small amount of deliberation. |
| `low` | Low reasoning budget. Good for moderately simple tasks where some reasoning is helpful but speed matters. |
| `medium` | Moderate reasoning budget *(default for GPT-5 nano)*. Balances quality and latency for most use cases. |
| `high` | High reasoning budget. Better on multi-step or analytical tasks; noticeably slower. |
| `xhigh` | Extended reasoning budget. Use for complex reasoning workloads where accuracy matters more than latency. |
| `max` | Maximum reasoning budget. Highest quality; highest latency and cost. Reserve for the most demanding tasks. |
Start with `medium` for most experts. Move to `high` or `xhigh` only when you observe that the expert struggles with multi-step reasoning or complex analytical tasks — the latency and cost increase is significant.
## Step 4: Configure Capabilities
In the **Config** step, you connect the expert to external tools and optionally define automation templates.
### Hives vs MCP Servers
**Hives** are Braintrust's pre-built tool bundles for common integrations — Google Drive, Sheets, Gmail, Notion, Jira, Supabase, and more. Each user who hires the expert configures their own credentials independently (OAuth or API key), so data is always private and isolated per user.
**MCP Servers** are custom endpoints you bring yourself. Use them only when a hive does not exist for the service you need.
**Always prefer Hives when available.** They are tested, maintained by Braintrust, and handle credential management automatically. Custom MCP servers require you to maintain the endpoint and debug connection issues yourself.
See the [Hives Reference](/experts/hives-reference) for further info about the hives.
Click **Add Hive** and select every service the expert needs to do its job. Start minimal — you can add more after testing.
Every extra tool increases complexity. Add only what the expert actually needs.
If a required service has no built-in hive, add a custom MCP server with its **Name**, **URL**, and **Transport** (`sse` or `streamable_http`). Click **Verify** for each server before continuing — an unverified server will fail silently at runtime.
Hive Env Overrides let you set shared default values for a hive that apply to all users of this expert — for example, a default Jira project key or a default database name.
Use overrides for **safe, non-sensitive shared defaults only**. Never put API keys, secrets, or credentials here — those belong in each user's per-user credential flow and are visible to anyone who can edit the expert.
Automation Templates are cron or calendar trigger blueprints baked into the expert's blueprint. When a user hires the expert, these templates appear as **Standard Triggers** they can enable and configure.
Use these when you want to ship a pre-built automation with the expert — for example, a weekly report template or a pre-meeting briefing trigger. Leave empty if the expert is purely interactive.
Only add automation templates once the expert's core chat behavior is stable. Debugging a broken trigger is harder than debugging a broken prompt.
## Step 5: Set Access
In the **Access** step:
1. Choose a unique `Expert Email` local part.
2. Set visibility to `Private` or `Public` (**default is Private**).
## Step 6: Review and Submit
In **Review**:
1. Confirm prompt, tools, automations, and visibility.
2. Submit to create the expert.
3. Open the expert page and hire it yourself for validation.
## Post-Create Validation Checklist
* Hire the expert and confirm DM opens successfully.
* Run a simple prompt and one realistic task prompt.
* Confirm required tools can actually access data.
* If automations were added, run a quick trigger test.
* Verify output quality and update prompt before broad rollout.
## Field Notes That Match Current UI
* `Logo` uses a **Logo URL** field (no file upload in create form).
* `MCP` supports `Name`, `URL`, and `Transport` (`sse` or `streamable_http`).
* `Automation key` is generated from display name and should stay unique.
* `Access list` is managed after creation in **Manage Access**.
## Common Mistakes to Avoid
* Prompt is too vague.
* Too many hives/tools on first version.
* Publishing public before real task validation.
* Adding automations before core chat behavior is stable.
## Connect a GitHub repo (optional)
The **Source Repo** field on the Create Expert form records a GitHub repository URL on the expert. It is a **metadata-only** field — entering a URL stores the value as `sourceRepoUrl` on the expert record but does not by itself move any data between Braintrust and GitHub.
| Value | Meaning |
| --------- | --------------------------------------------------------------------------------------------------------------------------------------------- |
| `none` | Disables chain-of-thought reasoning entirely. Fastest and cheapest; use for simple, well-defined tasks. |
| `minimal` | Minimal reasoning budget. Marginally slower than `none`; suitable for straightforward tasks that benefit from a small amount of deliberation. |
| `low` | Low reasoning budget. Good for moderately simple tasks where some reasoning is helpful but speed matters. |
| `medium` | Moderate reasoning budget *(default for GPT-5 nano)*. Balances quality and latency for most use cases. |
| `high` | High reasoning budget. Better on multi-step or analytical tasks; noticeably slower. |
| `xhigh` | Extended reasoning budget. Use for complex reasoning workloads where accuracy matters more than latency. |
| `max` | Maximum reasoning budget. Highest quality; highest latency and cost. Reserve for the most demanding tasks. |
Start with `medium` for most experts. Move to `high` or `xhigh` only when you observe that the expert struggles with multi-step reasoning or complex analytical tasks — the latency and cost increase is significant.
## Step 4: Configure Capabilities
In the **Config** step, you connect the expert to external tools and optionally define automation templates.
### Hives vs MCP Servers
**Hives** are Braintrust's pre-built tool bundles for common integrations — Google Drive, Sheets, Gmail, Notion, Jira, Supabase, and more. Each user who hires the expert configures their own credentials independently (OAuth or API key), so data is always private and isolated per user.
**MCP Servers** are custom endpoints you bring yourself. Use them only when a hive does not exist for the service you need.
**Always prefer Hives when available.** They are tested, maintained by Braintrust, and handle credential management automatically. Custom MCP servers require you to maintain the endpoint and debug connection issues yourself.
See the [Hives Reference](/experts/hives-reference) for further info about the hives.
Click **Add Hive** and select every service the expert needs to do its job. Start minimal — you can add more after testing.
Every extra tool increases complexity. Add only what the expert actually needs.
If a required service has no built-in hive, add a custom MCP server with its **Name**, **URL**, and **Transport** (`sse` or `streamable_http`). Click **Verify** for each server before continuing — an unverified server will fail silently at runtime.
Hive Env Overrides let you set shared default values for a hive that apply to all users of this expert — for example, a default Jira project key or a default database name.
Use overrides for **safe, non-sensitive shared defaults only**. Never put API keys, secrets, or credentials here — those belong in each user's per-user credential flow and are visible to anyone who can edit the expert.
Automation Templates are cron or calendar trigger blueprints baked into the expert's blueprint. When a user hires the expert, these templates appear as **Standard Triggers** they can enable and configure.
Use these when you want to ship a pre-built automation with the expert — for example, a weekly report template or a pre-meeting briefing trigger. Leave empty if the expert is purely interactive.
Only add automation templates once the expert's core chat behavior is stable. Debugging a broken trigger is harder than debugging a broken prompt.
## Step 5: Set Access
In the **Access** step:
1. Choose a unique `Expert Email` local part.
2. Set visibility to `Private` or `Public` (**default is Private**).
## Step 6: Review and Submit
In **Review**:
1. Confirm prompt, tools, automations, and visibility.
2. Submit to create the expert.
3. Open the expert page and hire it yourself for validation.
## Post-Create Validation Checklist
* Hire the expert and confirm DM opens successfully.
* Run a simple prompt and one realistic task prompt.
* Confirm required tools can actually access data.
* If automations were added, run a quick trigger test.
* Verify output quality and update prompt before broad rollout.
## Field Notes That Match Current UI
* `Logo` uses a **Logo URL** field (no file upload in create form).
* `MCP` supports `Name`, `URL`, and `Transport` (`sse` or `streamable_http`).
* `Automation key` is generated from display name and should stay unique.
* `Access list` is managed after creation in **Manage Access**.
## Common Mistakes to Avoid
* Prompt is too vague.
* Too many hives/tools on first version.
* Publishing public before real task validation.
* Adding automations before core chat behavior is stable.
## Connect a GitHub repo (optional)
The **Source Repo** field on the Create Expert form records a GitHub repository URL on the expert. It is a **metadata-only** field — entering a URL stores the value as `sourceRepoUrl` on the expert record but does not by itself move any data between Braintrust and GitHub.
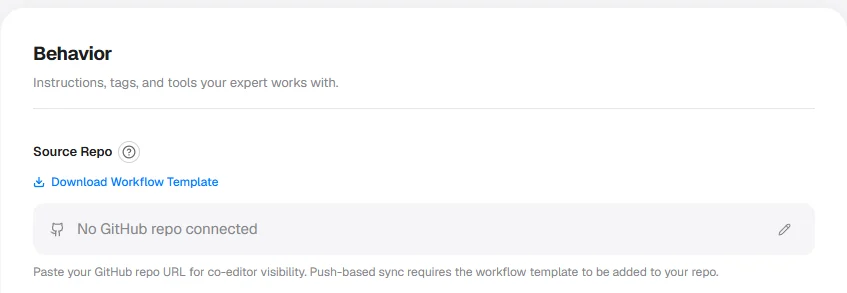 **What it does:** once a repo URL is set and the workflow file (see below) is committed to that repository, Braintrust **pulls** skill and prompt updates **from GitHub into Braintrust**. Sync is **uni-directional**: `github → braintrust` only. Braintrust never writes back to your repository.
**Where it appears:** at the bottom of the Create Expert form, below the main configuration sections.
**Accepted format:** a full GitHub repository URL.
Use the format `https://github.com/owner/repo`. The field rejects SSH-style URLs (`git@github.com:...`) and bare `owner/repo` shorthand.
**Workflow template download:** the Source Repo field also exposes a workflow-template download. Download the template file and commit it to your connected repository to activate the sync workflow. Without the workflow file in the repo, the sync will not run.
Edits made in the Braintrust UI are **not** pushed back to GitHub. Only changes committed to the connected repository (and processed by the workflow file) update the expert's prompts and skills in Braintrust. If you edit prompts or skills in the UI while the sync workflow is also active, your UI edits can be overwritten the next time the workflow runs.
This field is optional. Leave it blank if you do not manage expert configuration in GitHub.
## Next Steps
What every field means, and how to choose values.
Configure OAuth, API keys, and reconfiguration flows.
Update behavior, tools, access, and rollout settings.
Control who can view, hire, and edit experts.
**What it does:** once a repo URL is set and the workflow file (see below) is committed to that repository, Braintrust **pulls** skill and prompt updates **from GitHub into Braintrust**. Sync is **uni-directional**: `github → braintrust` only. Braintrust never writes back to your repository.
**Where it appears:** at the bottom of the Create Expert form, below the main configuration sections.
**Accepted format:** a full GitHub repository URL.
Use the format `https://github.com/owner/repo`. The field rejects SSH-style URLs (`git@github.com:...`) and bare `owner/repo` shorthand.
**Workflow template download:** the Source Repo field also exposes a workflow-template download. Download the template file and commit it to your connected repository to activate the sync workflow. Without the workflow file in the repo, the sync will not run.
Edits made in the Braintrust UI are **not** pushed back to GitHub. Only changes committed to the connected repository (and processed by the workflow file) update the expert's prompts and skills in Braintrust. If you edit prompts or skills in the UI while the sync workflow is also active, your UI edits can be overwritten the next time the workflow runs.
This field is optional. Leave it blank if you do not manage expert configuration in GitHub.
## Next Steps
What every field means, and how to choose values.
Configure OAuth, API keys, and reconfiguration flows.
Update behavior, tools, access, and rollout settings.
Control who can view, hire, and edit experts.